School Locker Pockets Made from Blue Jeans

Here’s an article that Gail Lee Martin wrote for the eHow site back in 2008.

“This easy craft using worn-out blue jeans will appeal to teens. I taught my granddaughter to make them for gifts for her friends in high school. The jean pockets with a magnet on the back make a handy storage pocket for a school locker. They stick right to a metal locker to hold pens or a notepad at a handy level.

Pocket full of daisies clipboard by deemac1

The locker pockets make fun gifts or can be used at home or in a work locker as well. Here’s how to make this easy craft.

I cut the hip pockets from my collection of blue jeans. I’d been saving them to make my son a blue jean quilt. We cut clear through the jeans to make an enclosed pocket with a front and a back. (photo by Gail Lee Martin)

You can get old jeans at yard sales or the Goodwill Store. Don’t worry if the knees are ripped, there are stains on them or the hems are frayed. All you need are the pockets. Check that the pockets are in good shape.

You can save the rest of the blue jeans to make pot holders, patchwork quilts, or even rag rugs.
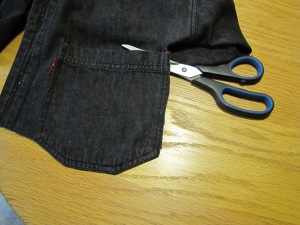
Cut around the jean pocket (photo by Virginia Allain)

Cut around the jean pocket (photo by Virginia Allain)

We glued magnetic strips to the back part of the cut-out jeans pocket so they would stick to the inside door of school lockers.

You can use old advertising magnets to glue onto the back of the pockets. It takes several to hold the pocket onto the metal. Magnets are also available in sheets from Amazon. Just cut them to the size you want.

Choose Some Embellishments to glue onto the jean locker pockets

Rummage around the house to see what decorative bits and pieces you have on hand. We decorated them to fit the person she was going to give them to.
Pink bows and buttons were hot glued to the front for one girl. Seashells or small rocks to some for the boys. Paper clips, erasers and pencils were added to another one. Many jeans have logos on their pockets that make them special to start with.

Add Rhinestones to the Blue Jean Locker Pocket if you want some bling

If you’re making these with your children or grandchildren, turn them loose with a variety of “jewels” or sequins so they can decorate their locker pocket to suit their personality.

Fabric Paints Look Great for Decorating the School Locker Pockets

Well, these just make this craft project even more fun for you! And your kids or grandkids will really get into decorating their locker pocket with these fabric paints.

What to Put in a Locker Pocket made of blue jean pockets

Small pads of paper, pens, rulers, whiteout and pencils were placed inside the pockets. They could even keep their house keys in the locker pockets.Other ideas would be a small pocket mirror and a comb.

Make Blue Jean Pockets for Mom or Dad

These would make cute gifts for a child to give their mother for the refrigerator door or sewing machine. Decorate them to suit the person and place. They would be great also for fathers to put in their workshop and garden shed.
School Locker Pockets Made from Blue Jeans poll
You can watch a video on YouTube demonstrating making jean locker pockets.
Short version of the instructions (screenshot from Gail's original article)

Short version of the instructions (screenshot from Gail’s original article)

Depression Era Thriftiness

After Mom’s book came out, a feature in USA Today commented on her memories of feedsack dresses. I’d seen the reporter’s query in HARO (Help a Reporter Out) and put her in touch with Mom. After a phone interview, this was the article published in October 2009.

An article in USA Today by Laura Vanderkam, Grandma's Greener Than You Are.

An article in USA Today by Laura Vandercamp, Grandma’s Greener Than You Are.

It resonated with people, resulting in blog posts like this one by Lisa in Oklahoma.

Here’s the section about Gail (2nd paragraph in the article shown in the clipping above).

Then I read 85-year-old Gail Lee Martin’s recent memoir, My Flint Hills Childhood. During the Great Depression, she reports, companies began selling feed and flour in colorful sacks, knowing full well that cash strapped customers would turn the material into children’s clothes. In her Kansas town “we traded sacks with our neighbors and relatives until we had the required yardage” for dresses, she writes.

Hers was far from the only family reusing what was possible — not because recycling was hip but because the family lacked the means to do anything else. Nonetheless, the result was the same: a lower impact lifestyle than most of us buying organic pajamas can fathom.

Read more about feedsack dresses.

cousins 1937

Ironing in the Good Old Days

This old iron would have been what Gail’s mother, Ruth McGhee, used to press the family clothes in the early 1900s. Even when electric irons came into use, she didn’t get one for a long time. They didn’t get electricity as soon as people in the towns did.

old iron

Photo by Virginia Allain

In the oil camps in the Kansas Flint Hills, they were still using oil lamps in the 1920s. The company housing for the oil workers was too far out in the hills for luxuries like electricity.

Consequently Ruth ironed her clothes with heavy irons like this. They were heated on the surface of the wood cook stove and then pressed against the clothes to remove wrinkles. You would have one getting hot, while you used the other one.

Irons Heating on Stove Greeting Card
Irons Heating on Stove 


You still see these around, but people tend to use them for bookends or for doorstops now. I sure wouldn’t want to iron with one.

Eventually the electric iron became available and simplified the ironing chores of housewives.

Making Turnip Slaw

Back in 2008, my mother published this recipe on the eHow website. Most people think of cabbage when making a slaw, but Dad grew too many turnips one year. They took their produce to the farmer’s market, but most people didn’t know what to do with turnips.

By creating recipes, Mom and Dad convinced more buyers to give the humble turnips a try. You probably have carrots, raisins, mayonnaise and sugar on hand and maybe even the lemon juice. Just get some turnips and try this refreshing summer recipe.

Click on the recipe to see it larger. You can even get the recipe on postcards to send to your friends.


Here’s the recipe as it appeared on eHow:

For a change from coleslaw, try this easy turnip slaw. This makes 6 to 8 servings.
Things You’ll Need:

3 cups shredded turnips
1/2 cup raisins (optional)
1/2 tsp. sugar
1 1/2 cup shredded carrots
1/2 cup mayonnaise
1 Tbsp. lemon juice
Shred the carrots and the turnips using a grater or in a food processor.
Combine the shredded vegetables in a bowl with the other ingredients.
Stir the ingredients together well.
Cover and chill.

Comments

Wordstock said on 1/17/2009 – I will be trying this. It would be a different taste for us. I have never heard of turnip slaw before.
Mactraks said on 4/29/2008 – Oh, sounds so good! I hope library patrons bring me buckets of turnips this summer.

How to Make Dandelion Jelly

This is an article that Gail Martin published with the eHow website back in 2008.

This old family recipe makes lovely jelly. My husband’s great-grandmother called it Golden Blossom Jelly. Here’s how to make it.

photo of a dandelion blossom by Virginia Allain

photo of a dandelion blossom by Virginia Allain

Dandelion Jelly Recipe

Things You’ll Need:
* 1 quart of bright dandelion blossoms
* 2 quarts water
* 5 1/2 cups sugar
* 1 package Sure-Jell
* 2 teaspoons orange flavoring
* 3 drops of yellow food coloring

  1. Pick the dandelion blossoms. Wash them.
  2. Bring them to a boil in two quarts of water. Boil for 3 minutes. When it first begins to boil, an unpleasant odor appears, but it soon leaves.
  3. Strain out the blossoms and discard those. Long ago, they strained it through cheesecloth, but you can use a colander or get a juice straining bag from catalogs that sell canning supplies.
  4. Add the Sure-Jell to 3 cups of juice. Bring that to a hard boil. Add the sugar. There are directions on the package.
  5. Return it to a hard boil again. Cook 2 1/2 minutes. During the last half minute, add the orange flavoring and the 3 drops of yellow coloring. I’m not sure where she got the flavoring, maybe from a Watkin’s salesman.
  6. Pour the jelly into small jars.
  7. Melt pieces of paraffin in a empty, clean, tin can by putting it in a pan of water on a low heat. When it becomes liquid, pour about an half inch thick over the jelly. As the jelly and paraffin cools they both will set up.

Tips & Warnings

* Place all canned goods in a dark place as sunlight and heat can change the color of the food. That is why our ancestors made pantries, cellars and caves. It was cooler there in the summer and warmer in the winter.
* This recipe comes from our pioneer ancestor, Mary Black, of Blackjack, Kansas. She died in 1903.
* Be sure to pick the dandelions from an area that you know is free of lawn chemicals.”

Historical marker for the Battle of Black Jack in Kansas

Historical marker for the Battle of Black Jack in Kansas